
Installing an LED display correctly is essential for achieving a flat appearance, stable performance, and efficient maintenance. For projects that require curved, rotated, or creatively shaped visual surfaces, magnetic mounting can make the installation process more adaptable. At Coblinks, we develop LED display solutions with practical installation and maintenance requirements in mind. Our MC Series is designed for fine indoor display applications and combines multiple cabinet sizes, magnetic modules, and flexible configuration options.
In this guide, we explain a practical installation process for our flexible LED display solutions and highlight the features that can help project teams work more efficiently.
Step One Prepare the Installation Surface
Before installing any flexible LED display panels, the first step is to confirm that the supporting structure is suitable for the planned display configuration. The surface should be clean, stable, and accurately aligned. For wall-mounted applications, our MC Series can achieve a finished thickness of less than 65 mm according to the product information.
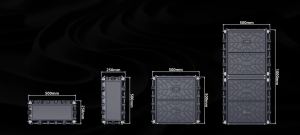
Planning should also consider the final screen shape. The MC Series supports mixed cabinet sizes, including 500 × 1000 mm, 500 × 500 mm, 500 × 250 mm, and 250 × 500 mm. These sizes can be mixed to create different layouts rather than restricting the installation to one standard rectangular configuration.
Step Two Plan the Cabinet Layout
Once the supporting surface is ready, determine the cabinet arrangement before attaching the modules. Careful planning is particularly important when a flexible LED display needs to follow a curved or creative structure.
The MC Series supports 0° to 90° rotation and arc splicing, allowing concave, convex, and rotated configurations. Its four available cabinet sizes can also be freely combined. This gives integrators and project designers more freedom to adapt the display to architectural requirements.
For custom projects, we recommend confirming the complete layout, connection arrangement, viewing direction, and maintenance access before physical installation begins.
Step Three Position the Magnetic Modules
The magnetic mounting system is one of the key installation features of our flexible LED display panels. According to the MC Series product specifications, each module is equipped with 16 magnets to improve flatness and help prevent warping. Four positioning posts also support accurate alignment and help prevent deformation.
To install a module, position it carefully against the prepared mounting structure and allow the magnetic system to hold it in place. Check its alignment with the neighboring module before continuing. This approach eliminates the need for loose screws during module installation and makes individual module removal more convenient during maintenance.
Step Four Check Flatness and Alignment
After several modules have been installed, stop periodically to check the overall surface. Small alignment errors can become more visible as the display becomes larger, particularly when the screen contains curved or rotated sections.
The MC Series incorporates magnets, positioning posts, and reinforced cabinet ribs as part of its protection and structural design. These features are intended to improve panel flatness and reduce deformation.
For a flexible LED display, maintaining the intended geometry is especially important. The display should follow the planned configuration rather than being repeatedly bent or forced into an unsuitable shape.
Step Five Complete the Connections and System Setup
After the modules and cabinets are positioned correctly, complete the power and signal connections according to the project design and the manufacturer’s installation documentation. The MC Series integrates the power supply, HUB, and receiving card into a three-in-one system, helping reduce the number of separate components and simplify wiring.
The available specifications include AC110 to AC220 input voltage, a refresh rate of at least 3840 Hz, and front and rear maintenance. Depending on the selected pixel pitch, brightness ranges from 600 to 800 cd/m². The series is available from 1.25 mm to 3.91 mm pixel pitch.
These specifications should be selected according to the viewing distance, content requirements, and indoor application rather than simply choosing the smallest pixel pitch.
Step Six Inspect the Completed Flexible LED Display
Before putting the screen into regular operation, inspect the entire installation. Check module alignment, cabinet joints, signal connections, power connections, image uniformity, and the overall screen shape.
Our MC Series supports front and rear maintenance, allowing project teams to access modules, the power supply, and HUB from either direction. The product also has an IP40 rating and an operating temperature range of -20°C to +50°C.
For customers developing customized flexible LED display panels, these installation and maintenance characteristics can help simplify project planning and long-term service.
Build Flexible LED Displays Around Real Project Requirements
Magnetic installation is valuable because it combines secure positioning with convenient module access. However, successful installation still depends on accurate structural planning, proper alignment, suitable system configuration, and careful commissioning.
The MC Series brings together multiple cabinet sizes, magnetic modules, creative splicing, and front and rear maintenance for different indoor display requirements. Whether the project calls for a flat commercial wall, a curved surface, or a more creative layout, the configuration can be adapted to the installation environment and intended use. Coblinks works with customers on specifications and customization before production, helping ensure that the final display fits the project rather than forcing the project to fit a standard screen.